After having taken back my BMW R1200RT 90 years anniversary edition (so build in 2013) from regular maintenance/servicing at me BMW dealer, I got at the next day in my check display the warning that my DWA battery was low. Appearantly the battery got just under the threshold for popping up a warning just after the visit to the dealer, so that I had the choice to let this be done at the dealer or to do it myself. My choice was DIY.
DWA is abbreviation of Diebstahl Warn-Anlage, or Anti-Theft Alarm in plain English. I tried to find a description on the internet on how to replace the battery/batteries, but I could not find it for my specific make/build of R1200RT. There are some pictures and descriptions available for older R1200RTs as well as for the R1200GS, but not for my make of R1200RT. So I had to try and find out the best and easiest way by myself, and I have documented it with pictures below. As also the battery of my remote was low, I had replaced that one too but as that is pretty straight-forward task and well described in the manual about the alarm system, I did not further document that with pictures and description.
When you are a handy person, you should be able to perform this task too. When you choose for replacing the batteries of your alarm by yourself by using the instructions below, then please be aware that you are doing this at your own risk! I have constructed this description on base of my experience while doing this task by myself.
First a description on what you need to perform this job:
- 2x CR123A batteries
- a long Torx 30 driver bit (for removing the top case rack). With a short Torx 30 driver bit you will not be able to disassemble the 2 rear Torx bolts of the top case rack
- Socket wrench to use Torx 30 driver bit
- Philips PH2 screw driver (you can use a short one as on picture below or a long one)
- Philips PH0 screw driver (for front 2 screws on the alarm unit – forgot to put it on the picture with tools)
- Philips PH0 bit (for the rear 2 screws on the alarm unit)
- Cupper grease (to be applied on the thread to prevent having issues to remove the 8 Torx 30 bolts next time you want to remove the top case rack)


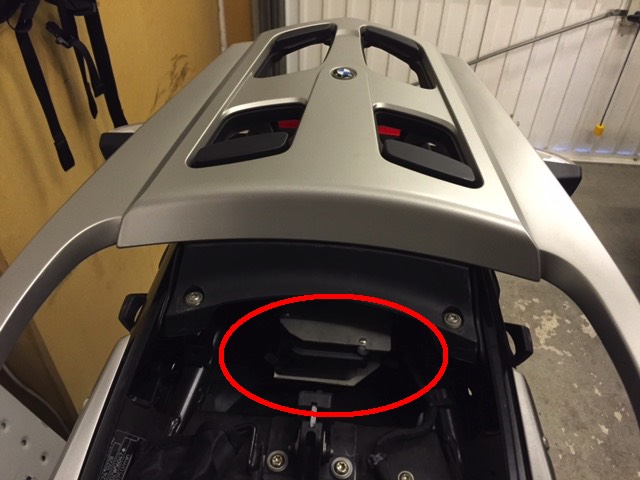
The alarm unit on the BMW R1200RT 90 years anniversary edition is behind the rear seat underneath the top case rack. On top of the alarm unit there is a steel plate lifted above the plastic cover with little white plastic distance tubes/pieces: this in order to still provide the build in horn enough room to have it exhaust loud sound in case of an alarm. To get better access to the alarm unit it will be necessary to get the top case rack off which requires 8 Torx bolts to be removed.
Best starting point is to first remove the tail light cover in order to grant yourself access to the rear most Torx 30 bolts of the top case rack. For this it is necessary to remove the 2 black Philips screws, holding the tail light cover, with a PH2 screw driver (see picture below).

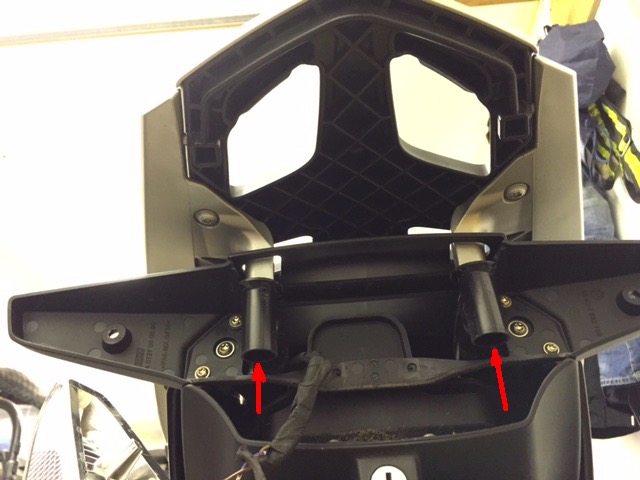
When having removed the tail light cover, you can access the rear 2 Torx 30 bolts (out of 8 Torx bolts in total) of the top case rack. The 2 Torx 30 bolts are in the black tubes marked with arrows in the picture below. For getting the Torx bit driver to reach the bolt head you need to have a long Torx 30 bit driver … I was not able to do this with a short Torx 30 bit driver! Do NOT try to unscrew the top plate of the rack, as those grey Torx bolts (visible on the picture but not market) NOT meant for disassembly and likely will break/damage the “nut” in the top plate.
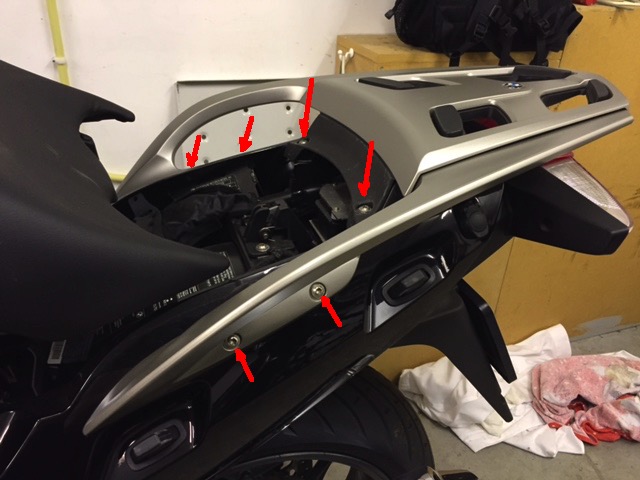
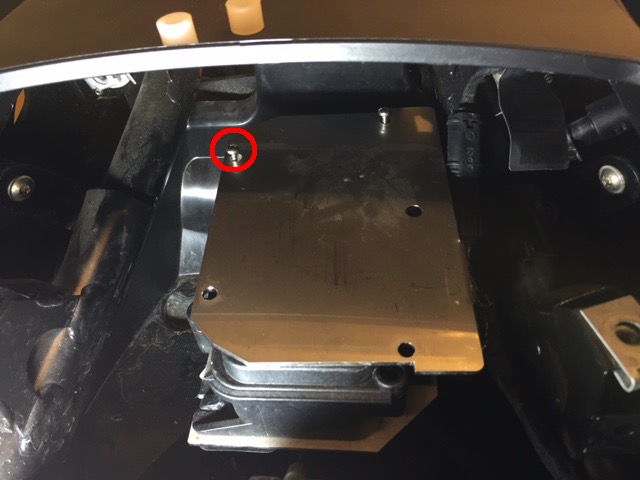
Next you can remove the other 6 Torx 30 bolts: 2 which are normally below the rear seat and 4 which are located at the handgrips. See red arrows in the picture below.
Next on is the unscrewing (without removing them yet) of the 4 Philips PH0 screws which hold the top steel plate and top plastic cover of the alarm unit. Front ones can be done with a normal Philips pH0 screw driver, for the back 2 screws you can use a PH0 bit (with blue rectangle in the picture below) as these screws are hand-/finger-tight fixed. Best sequence is to first to the rear ones, and then the front ones: this in order to prevent that the front screws are your way for unscrewing the rear ones.
After having unscrewed, you can remove each screw and white plastic distance piece between steel plate and plastic top cover so that you prevent that a plastic distance piece falls into a difficult to recover place. After that you can lift the top plastic cover. Watch out for not damaging or pulling off the 2 cables. You can disconnect the cables but they are not very easy to connect again (especially the one of the horn), so when you can work securely without disconnecting them from the board then that has preference. When I performed this task the connector of the horn disconnected and I had to prey it in later: this must be the work of a person with tiny fingers at the supplier of the alarm as it took me a little time to get it back into place.


On the inside of the lifted plastic cover you will see 6 screws. The 4 in a rectangle are the ones of the horn and can be left as they are: you need to unscrew only 2 Philips screws marked in the image below with a Philips PH0 screw driver to remove the plastic cover to the battery bay. Watch out not to drop the screws onto the electronic board as this can create a short cut. Consider covering the electronics in case you want to be save!

With plastic cover to the battery bay removed, you can replace the old batteries by new ones. Watch the orientation of the batteries to correctly put in the new batteries: as rule of thumb, the (-) pole of the battery is at the spring side in the battery bay.

With the new batteries in, you can now start with putting everything back together again. First to place the plastic cover with the 2 philips screws back into the alarm top cover.
I found it easiest to fit the (orange in the picture above) rubber sealing into the plastic cover and putting the plastic cover back onto the alarm housing. Have a final check that both the connectors are still well in place. Take care that the rubber sealing is not folded together and that properly it aligns with the housing as it is THE seal to keep water and dirt away from the electronics of your alarm!
For screwing back together the plastic alarm cover, the white plastic distance pieces, and the steel top plate, I found it easiest to start with the most difficult location. This is the rear screw on the left-hand side of your bike. So put one Philips screw through the steel plate, and hold with it a white plastic distance piece, and put this all into place. Give the screw a small turn to keep all well in place. See picture below.

Next put a white plastic distance piece between steel plate and plastic cover at the rear right-hand side screw position, and put in a Philips screw and give it a turn by hand. See picture below.
Next you can put the white plastic distance pieces in for the front screws, put in the front screws, and give each of them a turn by hand. Now you can fix the front screws with a Philips PH0 screw driver (gentle but fixed), and for the rear you can use your Philips PH0 bit to fix them by hand.
For assembling the top case rack you can follow the reverse sequence as described above, so first the 2 Torx bolts at each side of the handgrip, the 2 Torx bolts which normally are under the back of the rear seat, then the 2 Torx bolts which are in the black tubes above the tail light cover. Apply some cupper grease on the threads to prevent issues to unsighted the bolts next time, and do not apply too much torque to it!
After that you can mount again the tail light cover. Take care that you do not squeeze cable / cables. And you are done with replacing the alarm / DWA batteries.
As the battery in my alarm (DWA) remote was also low, I had to replace that one too. For this you need one CR2032 cell. Replacement is simple and well described in the manual (see page 18 of 23 in the PDF – link below). After battery replacement, it is necessary to synchronise the remote to your alarm as described on page 19 of 23 in the PDF linked below.
Instructions manual for Use Anti-Theft Alarm DWA6
Happy DIY time! Please share your experience or remarks in the comment section below.
Thanks to “Ootje” active on Motor-Forum.nl for the tip of applying some cupper grease on the threads of the Torx 30 bolts holding the top case rack, so that they can be loosened without issues next time alarm batteries need to be replaced.

Thanks for sharing gonna do this tomorrow
Good luck, and please share whether all worked out well.
OK, I tried to remove the rear rack and the torx inside the tubes in the tail light assembly and one side was successful and the other side just kept turning…I thought now what…come to find out that bmw used loctite on the screws up in the bushing and the bushing is now stripped out in the the plastic…then the plastic broke on the hand hold at this point…I did get the rack off…broken…then I tried to unscrew this hand hold from the rest of the rack and they must have used loctite as well…spin…the BMW dealer can’t get it unscrewed either…$1,000 for the whole rack….drat.
That sucks.
I had first tried the ones of the rack, and had same issue with the first one due to which I wrote my experience down. I do not have a top case so not dramatic for me.
With all the bolts I had described it worked for me.